You Can Make a Simple Tufted Headboard
April 12, 2007 § 2 Comments
If I can do it, then anybody can. Heard that before? Well here’s the scoop on making padded headboards.
Tools I used: large piece of plywood, scrap wood like small 2x4s, 3-inch foam, quilt batting, spray adhesive, staple gun, circular saw, studfinder, power drill, power screwdriver, pliers, level, pencil, covered button kit, scissors, coordinating fabrics, ear protection for using the saw, and eye protection.
I started my project around 9:00 a.m. and finished around 2:00 p.m. So I wouldn’t call it quick, but it was fairly straight forward.
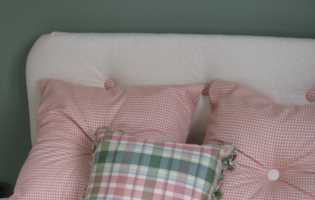
The design was a very simple rectangular padded headboard with three large tufted buttons. And I planned to mount the headboard directly to the wall above the bed (I had tried leaning headboards up against the wall but they always seemed to flop. Putting it on legs would be fine too but attaching it to the wall seemed most sensible.)
1. Using a studfinder, I found two studs on the wall behind the bed and affixed a piece (around 2-ft long) of scrap lumber to the wall by using long screws.
2. After measuring the width of the bed and deciding how high to make the headboard, I cut the headboard shape, in my case a simple rectangle, from plywood using a circular saw and attached a piece of 3-inch foam to the wood by using spray adhesive. (Electric knives are great for cutting foam.)
3. Using a large sheet of quilt batting material, I covered the foam and stapled the batting to the back of the headboard. (It’s best to cover the batting with a sheet and staple to the headboard for a smooth, professional look — I skipped this step because I was planning to tuft and the fabric was lumpy anyway.)
4. I stapled the fabric to the headboard (put one staple in each side first — top, bottom, side, side — and then proceed to staple the rest. The corners should be neatly folded or cinched — each corner done the same way to match.)
5. Using coordinating fabric, I made three large covered buttons from button-making kits. A great way to customize and dress up a project.
6. I drilled a hole on the back of the headboard opposite where the button was to go. Then I used a turkey-dressing metal “needle” to thread through from the front to the back of the headboard, through the foam and out the hole on the back. Finding the hole was the hardest part of the project but patience helped.
7. With the “needle” through to the back, I put my knee on the button and pushed to cinch in the foam and create the tuft. Then I fed the “needle” through a plain button on the back of the headboard and twisted the metal “needle” with pliers. Voila! Tufting the other two buttons was much easier once I measured and then measured again.
8. Then I mounted a long strip of wood to the back of the headboard and rested the headboard on the wooden wall strip. After pre-drilling, I secured the headboard to the wall mounting with long screws.
Note: The headboard rocked against the wall so I removed it and mounted a small 2×4 directly to the wall in order to brace the headboard from behind. Then I remounted the headboard on the wall. Done.

We’re starting a master bath renovation and want to ask advice on hardware finishes.
We’re looking to do a classic style bath with travertine tiles, light cabinetry, clean lines but not starkly contemporary. We were leaning toward brushed nickel faucets, lighting, etc. But we keep noticing that chrome seems to be making a come back in the decorating magazines.
We want a style that is not trendy but one we’ll be happy with for many years. We just gutted this bath, which was completely hunter green and very 1990s in appearance. We may be wrong, but we’re concerned that some of the trendier finishes (rubbed bronze, antique copper) may feel dated in just a few years.
What do you suggest?
Hi Alex,
Really good question. I kind of feel that way about the over use of glass tiles and all the specialty custom tiles. Nothing wrong with using them, but I think they’re going to date the bathroom to a certain decade.
As for hardware finishes, they do come in and out of fashion. Brass has been out but is slowly coming back and the same with chrome. We’re in the “bling” period where things are going sparkly and shiny. That too will pass.
I would go with either one: the brushed nickel for a soft matte finish or the chrome for a shiny clean-looking finish. Hold them both up to your tile and see whether you like the shiny or matte look. Both will be around for awhile, past the antique copper and others. If you keep things simple, they won’t stand out as trendy. Just classic.
Good luck.
-Barbara
Your Home & Color Coach