Over the River and Through the Woods
December 23, 2008 § 2 Comments
We’re off again to visit the family in Northern New York until New Year’s. I will check the blog as often as I can get to, yes, the library to use the internet. Might as well be in Siberia — my apologies to Siberia. But, hey, it’s home.
Have a wonderful holiday and let’s blog in 2009.
-Barbara, Your Home and Color Coach
Color Your Spirits for the Holidays
December 12, 2008 § 3 Comments
 Remember when the Grinch stole Christmas? All the trees, lights, stockings, and gifts — the trappings associated with a wonderful holiday celebration– were suddenly gone? They had vanished during the night while everyone down in Whoville slept. What happened next in this wonderful Dr. Seuss tale was even more remarkable for its simplicity. Despite losing everything, Whoville didn’t seem to care. All the Whos down in Whoville celebrated anyway.
Of course, the story has a happy ending, but for many people this year, the heartwarming bedtime story has led to a nightmare from which they cannot awaken fast enough. This year it truly feels a little like the Grinch has been here again. With the world-wide recession, job loss, and home foreclosures, many of us around the country are struggling to find that holiday spirit that we used to have and that we desperately want our children to experience in the midst of all this mess.
If you’ve had to cut back this year from your more typical shopping, decorating, and holiday festivities, you are not alone. Keep in mind that gifts can be simple (like homemade cookies), acts of kindness can mean more to people than more stuff, and spending time with our kids is ultimately the gift they’ll remember long past any particular disappointments on Christmas morning.
And to lift our spirits and with the festival of colors inspired by a child’s gingerbread house, let’s all go a little crazy with color this Christmas.
Dig out that snowman sweater from the back of the closet and wear it. Often. It’s going to bring a smile to somebody’s face and that’s a good thing.
String a row of colorful neckties, like garland, from one end of the wall to the other. Your kids will think you’re nuts but who cares?
Fill a big bowl with scraps of colorful ribbons and little balls of leftover yarn and a few silvery mismatched ornaments and display it in the middle of the coffee table. Now you’re getting the idea.
The holidays don’t have to be the way we knew them as kids. Times are different now. But you don’t have to spend much, if any, money at all if you dig deep into your hope chest of creativity for some colorful decorating ideas that will raise your spirits and everyone else’s too.
Mary Myers Cole: An Inspiration
December 9, 2008 § 3 Comments
Mary’s gift to her little cousin Barbie: an eye shadow kit. It was a large gray plastic case that, when opened, revealed rows and rows of fabulous rich colors and came with several little brushes, perfect for experimentation, not on eyelids but on paper, like watercolors. I was hooked. Little did I know that decades later, I would look back at that gift (which probably had been free with a purchase at the Macy’s cosmetics counter) as one of my earliest inspirations and a huge clue that I would someday work with color. Mary had no idea at the time that her gift made such an impression. But Mary always made a huge impression on everyone she encountered.
Her love of art and color and style was evident just looking at her. From her tightly coiffed hair to her beautifully manicured hands, she was a study in elegance. And she wore her refined sense of color so we could all share her joyful effervescence. Her radiant smile and eloquent words spoke kindness and love to those for whom she cared most deeply: her dear friends at The Pines on Fire Island; her friends, neighbors and colleagues in New York and the art world; and her large network of family with whom she corresponded frequently.
Words cannot express how saddened we are by news of her untimely passing. Although she left us too soon, she left the world we live in a more beautiful place. Thank you Mary.
Happy Thanksgiving
November 26, 2008 § 2 Comments
Hi Bloggers,
Over the river and through the woods to Grandfather’s house we go…
Back blogging on Monday, December 1st.
Have a wonderful Thanksgiving!
-Barbara, Your Home & Color Coach
Blogging Update
November 21, 2008 § 2 Comments
Hi Bloggers,
I think I’m completely caught up with answering your blog requests. Again, sorry for the delay.
As we’re all facing the prospects of an extended recession, I am spending more time on my own marketing to get more local work. But I hope to be able to continue blogging with you and helping you all out with color decisions.
Thanks for visiting my site and stop back by soon for some low-cost decorating ideas.
-Barbara, Your Home & Color Coach
White, Light, and Color Go Together
September 18, 2008 § Leave a comment
I’ve said this in older posts, but I think it’s worth mentioning again. Nothing makes colors pop (pardon the over-used expression) like white. Whether it’s in your garden or in your home, adding white will make colors crisp and clear. You can add white trim, white linens, white curtains, white slipcovers, but whatever you do, add some white to your space and see the colors you’ve chosen for walls, furniture, or even your flower bed come alive. This photo of an HGTV Dream Home shows how white can also serve as a resting spot from intense wall color.

Remember this when you’re decorating kids’ rooms. All those hot pink and chartreuse wall colors need lots of white.
The other crucial element to using color is light. Poor light will muddy even the most beautiful colors and will turn whites to gray. Anyone with white walls can test this out. Look at your walls at various times of the day and see what colors your white walls become depending on the light in the room, whether it’s natural or artificial. Plan on updating your lighting before you start any redecorating plan so you are happy with the end result.
See older posts: Decorating with White and Before You Color Your Walls, Check the Lighting.
Update on My Responses to Your Questions
September 9, 2008 § 11 Comments
Hi Bloggers,
There are a lot of you out there with lots of questions about everything from room colors to exterior siding. I am going through all the questions from first-time visitors. If you don’t see your question pop up on the blog for a day or so, that means I’ll get to it soon. I’m off working with clients in my local area.
If you have a followup series of questions to my initial suggestions, please email me and we can work out a reasonable consultation fee. I’m afraid I won’t be able to answer follow-up questions on this blog as I’m trying to respond to everyone’s basic questions in a reasonable amount of time and they’re starting to pile up.
If your photos don’t go through to my email, just let me know, and I’ll give you another place to send them.
Thanks for visiting my blog and I hope we can solve your decorating dilemmas together.
Most sincerely,
-Barbara
Your Home & Color Coach
Back from Family Reunion at the Cottage
June 21, 2008 § 14 Comments


New windows

Hi Bloggers:
I’m back and what a culture shock. Nothing like two weeks gazing at sunsets and listening to waves on the lake to make you relax but getting back into the swing of things is challenging. There are TONS of queries waiting for me and I will try hard to answer everyone’s questions. We’re working on getting DSL up at the cottage — that will help keep the blog going even on vacations.
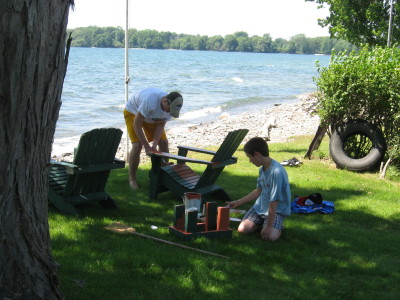
I’ve included some photos — my sons and I painted some lawn furniture and the new windows are finally all in. Next comes a fresh paint job on the cottage and maybe a new roof. But that’s enough for this summer. We’re just going to enjoy it.
Thanks for your patience! I’ll start with the ones that came in first and work down the list.
Check back periodically and I hope I’ll have your question answered.
-Barbara, Your Home & Color Coach
Reviving Old Furniture with Wall Color
May 13, 2008 § 16 Comments
 Do you have a sofa from the 80s that looked great back then but kind of looks sad at the moment? Of course, you can slipcover it, but how about punching up the color behind it. We took a living room with blah beige striped wallpaper and pastel patterned upholstery (in good condition) and brought it to life with a soft blue-green paint color (Benjamin Moore’s stratton blue HC-142) and some new pillows. What a difference. All of a sudden the sofas looked intentional and the room came alive.
The trick here is to pick a wall color that is rich but subdued. You need a greyed down shade for this effect to work. Otherwise, a bright wall color might just make your furniture look even older. But a nice tasteful splash of wall color will give your furniture a few more years of life. And in this age of recycling, re-purposing, and reusing old stuff, it’s all about making what you have work.
Before you drag your old furniture off to the consignment store, try painting your room.
